Introduction
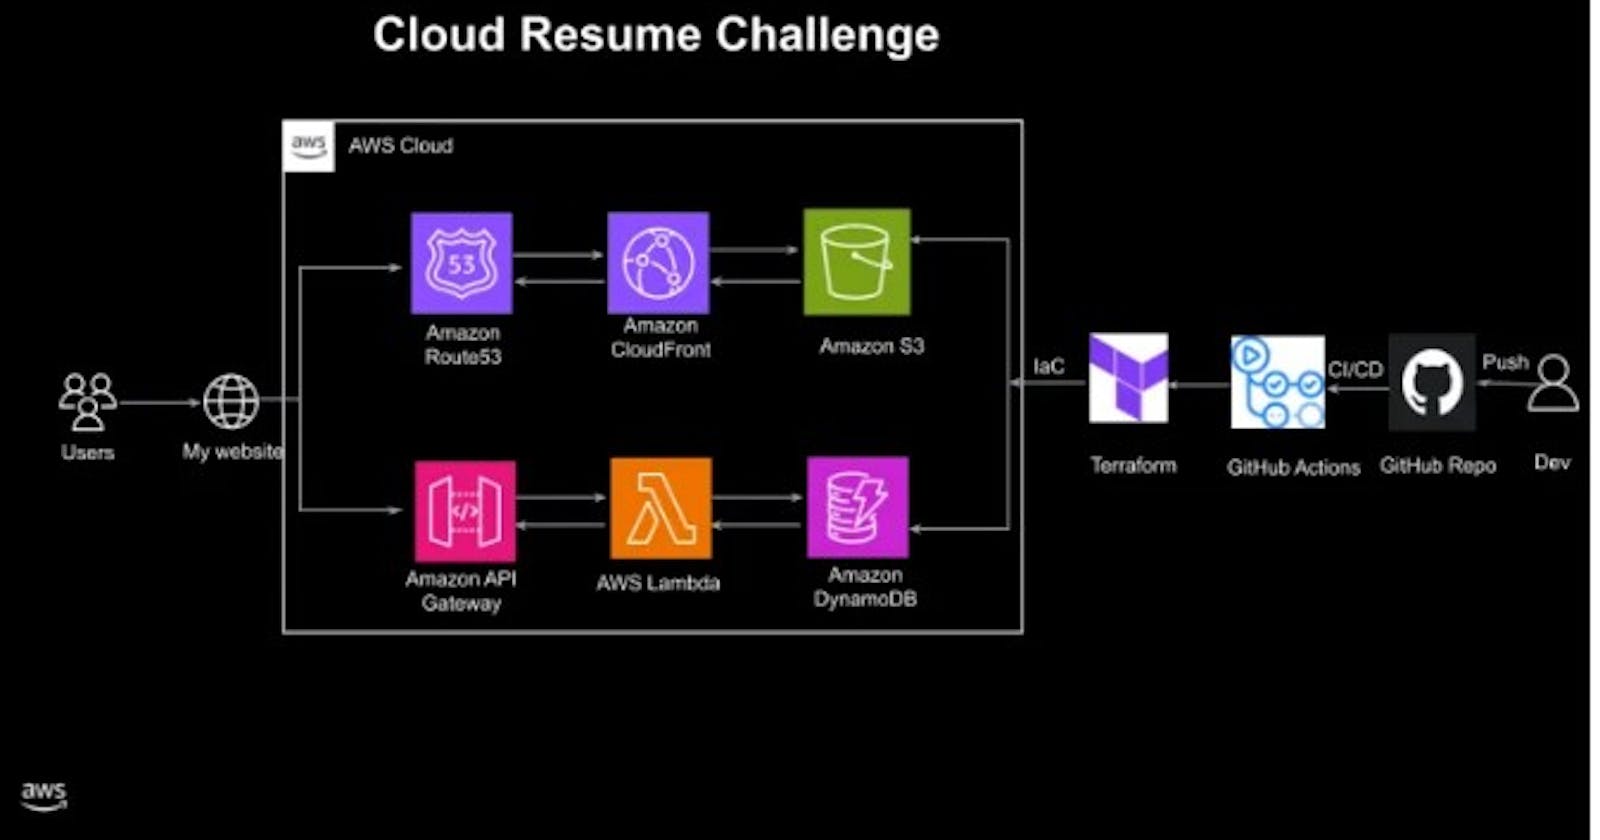
The cloud resume challenge by Forrest Brazeal is a 16-step challenge, The main goal is to get hands-on with some cloud technologies. The project involves building a personal resume website and deploying it using various AWS services.
Live Demo: https://resume.leilayesufu.uno/
GitHub Repository: https://github.com/leilayesufu/cloud_resume_challenge_aws
Services used
S3
CloudFront
Route 53
AWS Certificate Manager (ACM)
DynamoDB
Lambda
Steps
Certification: The challenge requires the resume to have an AWS cloud practitioner certification. I got the certification on the 17th of August 2023, a guide on how I prepared can be seen here.
HTML: The next step is to use HTML, CSS, and JavaScript to create a static website for your resume. I used a template from html5up and edited it to fit my details. Don't worry if you don't know HTML and CSS as most of it is already done for you in the template.
CSS;
Static Website: The resume should be deployed online as an Amazon S3 static website. This can be done by logging into your AWS console and navigating to the S3 service, creating a bucket with a globally unique name. Make sure to enable the "block all public access" setting to prevent unauthorized public access to the contents stored in the bucket. Once my bucket was created I went ahead and uploaded all my resume files into the bucket.
HTTPS: AWS's content delivery network(CDN) Cloudfront caches and distributes your website's content across a network of edge locations worldwide. CloudFront can be used to access our bucket without making it public. Create a distribution in the CloudFront service making sure to select the S3 bucket hosting your resume as the Origin domain and select "Origin access control settings" under Origin access, Allow only https access and make sure your default root object is your index.html file. After the distribution has been created copy the policy statement and paste it on your s3 bucket's permissions. You should now be able to access your resume website with the CloudFront URL.
DNS: This part of the challenge requires pointing a custom DNS domain name to the CloudFront distribution, View mine here https://resume.leilayesufu.uno/. I didn't have a domain name and purchasing domains on AWS is quite expensive so I purchased the cheapest domain I could find from Namecheap for $1.17 for a year and linked it to my AWS account.AWS Certificate Manager (ACM) is used to secure your website, I requested an SSL certificate for my domain from AWS Certificates Manager and also enabled HTTP to HTTPS redirect. Going back into my Cloudfront distribution, I set the alternate domain name to my domain name and made sure the default root object was the index.html file. After completing these steps, browsing https://resume.leilayesufu.uno/ directed me to my resume page.
Javascript: This part of the challenge requires JavaScript programming to make a view count that registers the number of visitors that have visited the website.
Database: In the DynamoDB service, I created a database(table) to store the views. After creating the table, I created a new item with an attribute name of "views" and a value of 0.
API: To connect the Javascript with the Database, the AWS Lambda service can be used. Make sure to give Lambda service permissions to access DynamoDB in settings.
Python: A Python function created on the Lambda service. Here's the Python code used for my Lambda function. This function gets the view count and updates the count when the page is refreshed.

Tests;
Infrastructure as code: The DynamoDB table and Lambda function were manually configured, by clicking around in the AWS console. Instead, it defined them using Terraform. This is called “infrastructure as code” or IaC. It saves time.
Source control: Create a GitHub repository and push your code there for tracking and managing changes to code.
CI/CD (Backend): GitHub Actions is used for the CI/CD (Backend).
CI/CD (Frontend): GitHub Actions is used so that when you push new code to your GitHub repository, the S3 bucket automatically gets updated. To do this I created a folder named .github|workflows at the root of my repository, and then I created a yaml file in it named main.yml and wrote the GitHub actions that upload the website to S3 when there's a push to the main branch. Make sure to not commit the environmental variables directly to the Git code instead use GitHub Actions secrets and variables.
Blogpost: Thank you for reading my blog post. : )
